Access: Difference between revisions
No edit summary |
No edit summary |
||
| (81 intermediate revisions by the same user not shown) | |||
| Line 1: | Line 1: | ||
''' | == Getting an account == | ||
Access to NU HPC facilities is free of charge for all NU faculty, research assistants, and students. However, accounts for research assistants and students must be sponsored and authorized by their PI (Principal Investigator—typically a faculty member or lab head). Accounts cannot be created at the direct request of students or research assistants; the request must always be initiated by the PI. PIs are expected to take '''full responsibility''' for the proper use of HPC facilities by their group members, including compliance with cybersecurity and acceptable-use policies. All NU HPC users must have a valid nu.edu.kz corporate email address. | |||
Below are step-by-step instructions for PIs to request new accounts for themselves and/or their group members: | |||
# To create a new group on NU HPC clusters (to which member accounts can later be added), the PI must complete the form in the [https://helpdesk.nu.edu.kz/support/catalog/items/326 NU IT Helpdesk ticketing system]. Instructions for submitting this request are provided on the same Helpdesk page. If, at the time of submission, the PI already knows which research group members require accounts on Shabyt, their names, emails, and positions may be included directly in the form. Please note that '''only the PI may complete this form''', regardless of how many accounts are requested or who they are for. Group members are not permitted to request accounts or submit forms on their own. | |||
# The NU HPC team will review the application form and approve or reject it based on the information provided. | |||
# Once approved, each new user will receive their username, a temporary password, and first-time login instructions directly from an HPC administrator. | |||
# If there is a need to add or remove group member accounts under a specific PI after the initial group has been created, the PI may submit a request through the [https://helpdesk.nu.edu.kz/support/catalog/items/272 NU Helpdesk ticketing system] (select ''HPC User Management'' in the drop-down menu) or by contacting the HPC administrators at [mailto:hpcadmin@nu.edu.kz hpcadmin@nu.edu.kz]. For new account requests, the PI must provide all required information about each group member (full name, email, position, and phone/messenger number). | |||
Important notes: | |||
* The PI assumes full responsibility for the proper use of HPC systems by their group members. If the PI cannot or does not wish to take this responsibility, they should not request accounts for them. | |||
* Use of NU HPC resources must comply with the [[Acceptable Use Policy]]. Non-research activities, irresponsible actions that could damage or disrupt the system, or violations of NU cybersecurity policies may result in account suspension and further administrative action. | |||
* As stated in the [[Acceptable Use Policy]], account sharing is strictly prohibited. The PI must request a separate account for each group member—a process that is quick and straightforward. To facilitate collaboration, a shared directory is automatically created for each group on our HPC clusters: <code>/zdisk/<groupname></code>. This directory can be used by group members to exchange files and data securely. | |||
== Access instructions == | |||
=== Use of VPN === | |||
Access to NU HPC facilities is currently restricted to connections originating from the internal campus network. Users connecting from outside the campus must use a VPN (Virtual Private Network). At NU, this requires the <code>GlobalProtect</code> VPN client. | |||
To request VPN access: | |||
* Visit the [https://helpdesk.nu.edu.kz/support/home NU IT Helpdesk] and type <code>VPN</code> in the search box. | |||
* Fill out the VPN access request form (available for NU employees and research assistants; PI approval may be required). | |||
* Follow the instructions provided on the Helpdesk page. | |||
''' | Please note: | ||
* NU VPN policies are subject to change. | |||
* The NU HPC team does '''not''' manage VPN accounts and is not responsible for their operation. For all VPN-related issues, contact the NU Helpdesk directly by submitting a support ticket. | |||
* VPN access is required only when connecting from '''outside''' the NU campus network. On campus, VPN is unnecessary—and in fact, a VPN connection cannot be established. | |||
''' | GlobalProtect corporate VPN differs significantly from consumer services such as NordVPN, Surfshark, or ExpressVPN. Consumer VPNs typically route ''all'' of your internet traffic through an external server, which can reduce bandwidth and slow down general browsing. By contrast, GlobalProtect VPN only secures connections to hosts located on the NU internal network, making your device behave as if it were physically on campus. It does not affect regular internet traffic to external sites (e.g., YouTube, online news, or podcasts), nor does it interfere with SSH connections to non-NU hosts. Because of this, you may safely leave GlobalProtect VPN running in the background at all times without impacting your everyday internet activities. | ||
=== Hosts === | |||
When a user is on the campus network or connected to it via VPN, he/she should use the SSH protocol (with the default port 22) to establish a connection with the interactive login/management node of the system they intend to use. The IP addresses of the login nodes are as follows: | |||
{| class="wikitable" | |||
|+ | |||
!System | |||
!Numeric IP address | |||
!Host name | |||
|- | |||
|Irgetas cluster | |||
|<code>172.25.1.32</code> | |||
|<code>irgetas</code> | |||
|- | |||
|Shabyt cluster | |||
|<code>10.3.64.61</code> | |||
|<code>shabyt</code> | |||
|- | |||
|Muon cluster | |||
|<code>10.3.64.46</code> | |||
|<code>muon</code> | |||
|} | |||
=== Two-factor authentication === | |||
- | Access to NU HPC systems requires two-factor authentication (2FA). You will be prompted to enter your password (first factor) and a six-digit PIN code (second factor). Before your first login, you must add a token to your mobile phone. Each new user receives a username, temporary password, and a QR code by email from the NU HPC administrator. Please follow the following steps: | ||
- | |||
- | |||
# Open the App Store on your iOS device or Google Play Store on your Android device. | |||
# Search for and install the [https://apps.apple.com/kz/app/google-authenticator/id388497605 Google Authenticator] (App Store) or [https://play.google.com/store/apps/details?id=com.google.android.apps.authenticator2 Google Authenticator] (Google Play Store) | |||
# Once installed, open the app and follow the on-screen instructions to set it up. | |||
# After setup is complete, you will be able to use the Google Authenticator app to generate a verification code when prompted during the login process. Please scan the QR code that is sent to you. | |||
=== SSH client software === | |||
There are many free and powerful third-party SSH clients available for all major operating systems. In addition, Windows, Linux, and macOS each include a native SSH client accessible directly from the command line. | |||
For example, in Windows you can simply open the Command Prompt (press <code>Windows</code>+<code>R</code>, type <code>cmd.exe</code>, and press Enter) and start an SSH session by typing: <code>ssh yourusername@shabyt</code> | |||
or <code>ssh yourusername@10.3.64.61</code>. On your first connection, you will be asked to confirm the authenticity of the host by typing <code>yes</code>. You will then be prompted to enter your password (first factor) followed by the six-digit PIN from the Google Authenticator app on your phone (second factor). | |||
[[File:Cmd connect 1.png|frameless|447x447px]] [[File:Cmd connect 2.png|frameless|447x447px]] | |||
If you prefer to use an SSH client with a graphical user interface on Windows, we recommend [https://www.putty.org/ PuTTY]. The following illustration shows how to connect using PuTTY: | |||
* In the PuTTY configuration window, enter <code>10.3.64.61</code> (the IP address of the Shabyt login node) in the <code>Host Name</code> field. | |||
* Under <code>Connection type</code>, select <code>SSH</code>. | |||
* Click the <code>Open</code> button. | |||
* On your first connection, PuTTY will display a security alert. Confirm it by clicking <code>Accept</code>. | |||
* A terminal window will open, prompting you to enter your username. Type your username and press <code>Enter</code>. | |||
* You will then be asked to enter your two authentication factors: | |||
** First factor: your password | |||
** Second factor: the six-digit PIN generated by the Google Authenticator app on your phone | |||
[[File:Putty.png|frameless|285x285px]] [[File:Known host.png|frameless|408x408px]] [[File:Login as.png|frameless|406x406px]] | |||
=== Transferring files === | |||
Files can be transferred between your personal computer and the HPC clusters using the <code>scp</code> command in the terminal. This command works like the standard Unix <code>cp</code> command, but allows you to specify a remote address as the source or destination. For example, to copy a file called <code>myfile.dat</code> from the local directory <code>/my/local/path/</code> on your computer to the remote directory <code>my/remote/path/</code> inside your home directory on the Shabyt cluster, use: | |||
<code>scp /my/local/path/myfile.dat john.smith@shabyt:~/my/remote/path/</code> | |||
Here, <code>john.smith</code> is your Shabyt username, and the tilde <code>~</code> is shorthand for your remote home directory path. On Shabyt, this corresponds to <code>/shared/home/john.smith</code>, so the full destination path would be <code>/shared/home/john.smith/my/remote/path</code>. | |||
As an alternative to <code>scp</code>, you can use the <code>sftp</code> command-line utility. This works like the traditional (but insecure) <code>ftp</code> command, but uses the Secure File Transfer Protocol (SFTP) for encrypted transfers. | |||
If you prefer a graphical interface for file transfer, there are many free and commercial SFTP and SCP clients available. A widely used option that supports SFTP on all major operating systems is [https://filezilla-project.org/ FileZilla]. For Microsoft Windows users, another popular choice is [https://winscp.net/ WinSCP]. | |||
__FORCETOC__ | |||
Latest revision as of 00:26, 27 September 2025
Getting an account
Access to NU HPC facilities is free of charge for all NU faculty, research assistants, and students. However, accounts for research assistants and students must be sponsored and authorized by their PI (Principal Investigator—typically a faculty member or lab head). Accounts cannot be created at the direct request of students or research assistants; the request must always be initiated by the PI. PIs are expected to take full responsibility for the proper use of HPC facilities by their group members, including compliance with cybersecurity and acceptable-use policies. All NU HPC users must have a valid nu.edu.kz corporate email address.
Below are step-by-step instructions for PIs to request new accounts for themselves and/or their group members:
- To create a new group on NU HPC clusters (to which member accounts can later be added), the PI must complete the form in the NU IT Helpdesk ticketing system. Instructions for submitting this request are provided on the same Helpdesk page. If, at the time of submission, the PI already knows which research group members require accounts on Shabyt, their names, emails, and positions may be included directly in the form. Please note that only the PI may complete this form, regardless of how many accounts are requested or who they are for. Group members are not permitted to request accounts or submit forms on their own.
- The NU HPC team will review the application form and approve or reject it based on the information provided.
- Once approved, each new user will receive their username, a temporary password, and first-time login instructions directly from an HPC administrator.
- If there is a need to add or remove group member accounts under a specific PI after the initial group has been created, the PI may submit a request through the NU Helpdesk ticketing system (select HPC User Management in the drop-down menu) or by contacting the HPC administrators at hpcadmin@nu.edu.kz. For new account requests, the PI must provide all required information about each group member (full name, email, position, and phone/messenger number).
Important notes:
- The PI assumes full responsibility for the proper use of HPC systems by their group members. If the PI cannot or does not wish to take this responsibility, they should not request accounts for them.
- Use of NU HPC resources must comply with the Acceptable Use Policy. Non-research activities, irresponsible actions that could damage or disrupt the system, or violations of NU cybersecurity policies may result in account suspension and further administrative action.
- As stated in the Acceptable Use Policy, account sharing is strictly prohibited. The PI must request a separate account for each group member—a process that is quick and straightforward. To facilitate collaboration, a shared directory is automatically created for each group on our HPC clusters:
/zdisk/<groupname>. This directory can be used by group members to exchange files and data securely.
Access instructions
Use of VPN
Access to NU HPC facilities is currently restricted to connections originating from the internal campus network. Users connecting from outside the campus must use a VPN (Virtual Private Network). At NU, this requires the GlobalProtect VPN client.
To request VPN access:
- Visit the NU IT Helpdesk and type
VPNin the search box. - Fill out the VPN access request form (available for NU employees and research assistants; PI approval may be required).
- Follow the instructions provided on the Helpdesk page.
Please note:
- NU VPN policies are subject to change.
- The NU HPC team does not manage VPN accounts and is not responsible for their operation. For all VPN-related issues, contact the NU Helpdesk directly by submitting a support ticket.
- VPN access is required only when connecting from outside the NU campus network. On campus, VPN is unnecessary—and in fact, a VPN connection cannot be established.
GlobalProtect corporate VPN differs significantly from consumer services such as NordVPN, Surfshark, or ExpressVPN. Consumer VPNs typically route all of your internet traffic through an external server, which can reduce bandwidth and slow down general browsing. By contrast, GlobalProtect VPN only secures connections to hosts located on the NU internal network, making your device behave as if it were physically on campus. It does not affect regular internet traffic to external sites (e.g., YouTube, online news, or podcasts), nor does it interfere with SSH connections to non-NU hosts. Because of this, you may safely leave GlobalProtect VPN running in the background at all times without impacting your everyday internet activities.
Hosts
When a user is on the campus network or connected to it via VPN, he/she should use the SSH protocol (with the default port 22) to establish a connection with the interactive login/management node of the system they intend to use. The IP addresses of the login nodes are as follows:
| System | Numeric IP address | Host name |
|---|---|---|
| Irgetas cluster | 172.25.1.32
|
irgetas
|
| Shabyt cluster | 10.3.64.61
|
shabyt
|
| Muon cluster | 10.3.64.46
|
muon
|
Two-factor authentication
Access to NU HPC systems requires two-factor authentication (2FA). You will be prompted to enter your password (first factor) and a six-digit PIN code (second factor). Before your first login, you must add a token to your mobile phone. Each new user receives a username, temporary password, and a QR code by email from the NU HPC administrator. Please follow the following steps:
- Open the App Store on your iOS device or Google Play Store on your Android device.
- Search for and install the Google Authenticator (App Store) or Google Authenticator (Google Play Store)
- Once installed, open the app and follow the on-screen instructions to set it up.
- After setup is complete, you will be able to use the Google Authenticator app to generate a verification code when prompted during the login process. Please scan the QR code that is sent to you.
SSH client software
There are many free and powerful third-party SSH clients available for all major operating systems. In addition, Windows, Linux, and macOS each include a native SSH client accessible directly from the command line.
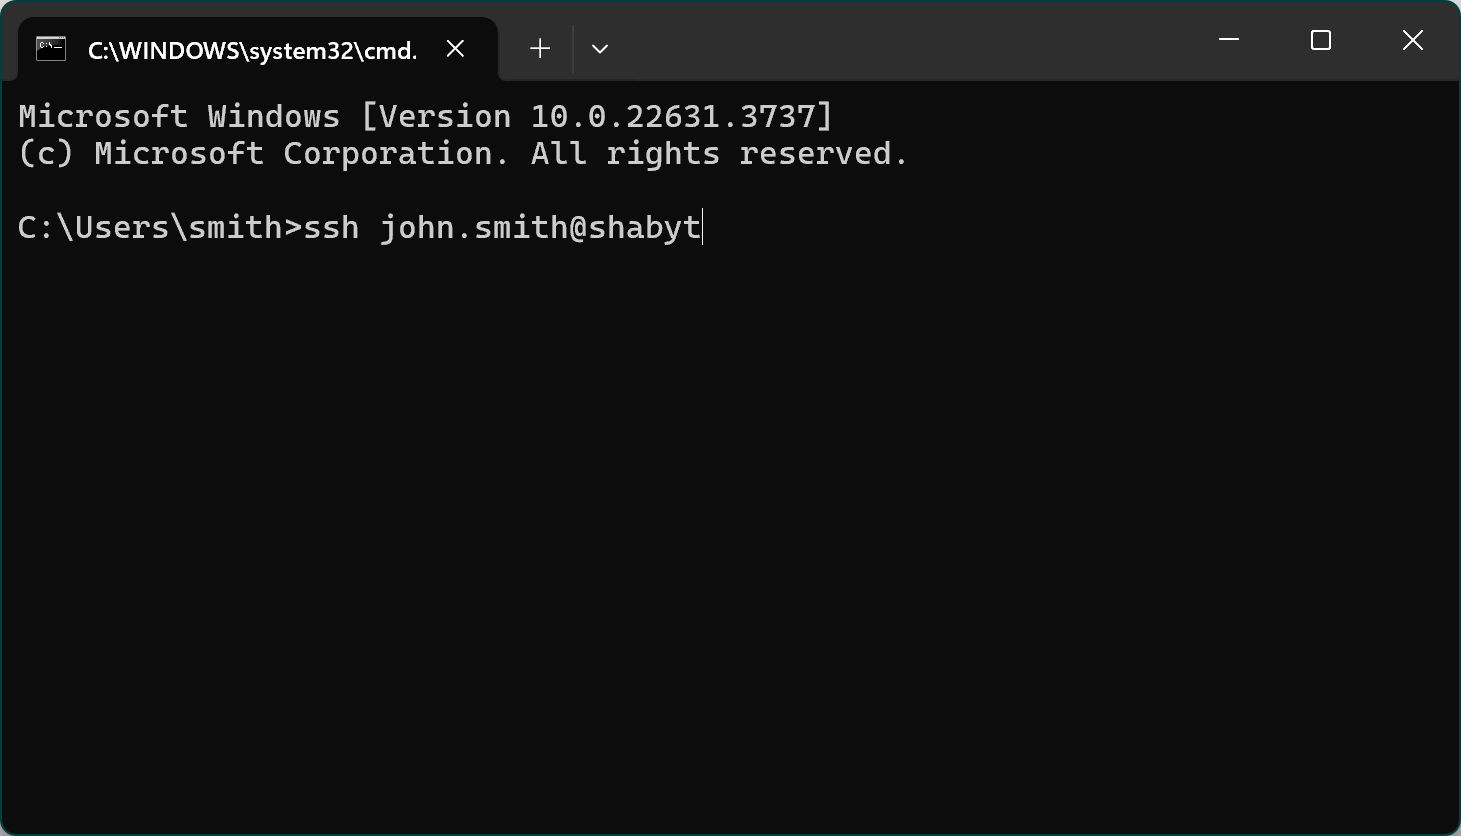
For example, in Windows you can simply open the Command Prompt (press Windows+R, type cmd.exe, and press Enter) and start an SSH session by typing: ssh yourusername@shabyt
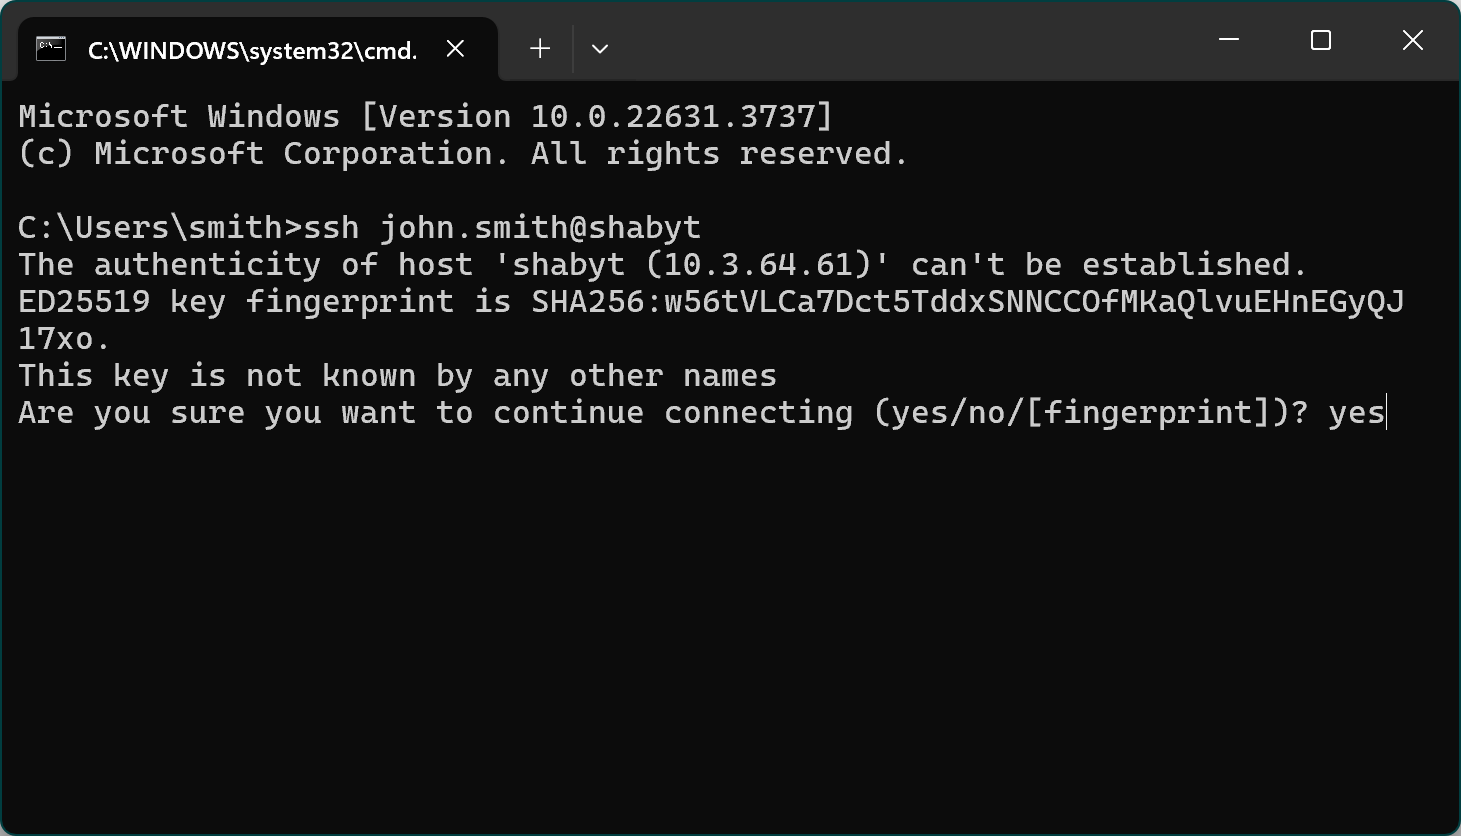
or ssh yourusername@10.3.64.61. On your first connection, you will be asked to confirm the authenticity of the host by typing yes. You will then be prompted to enter your password (first factor) followed by the six-digit PIN from the Google Authenticator app on your phone (second factor).
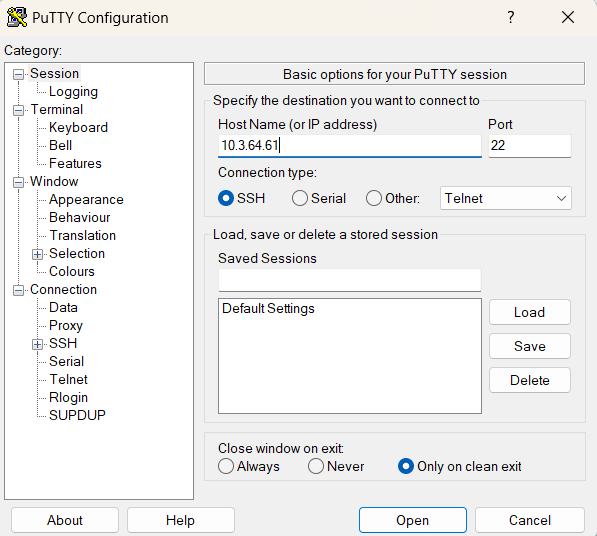
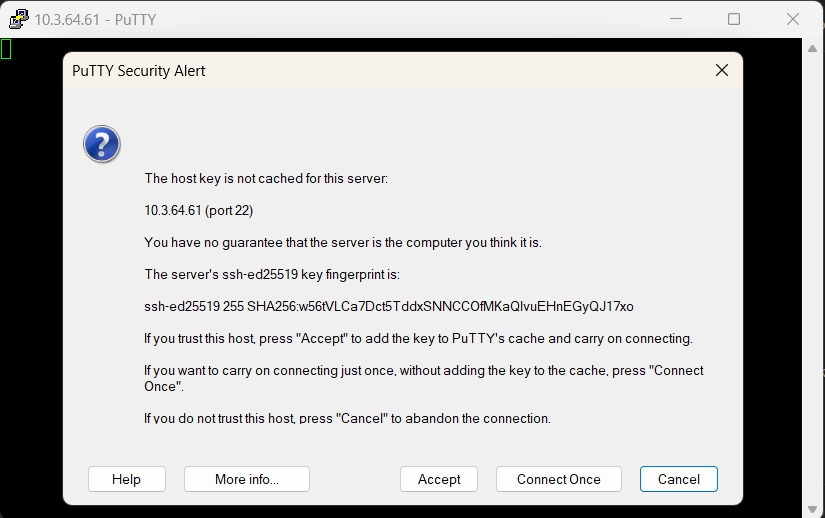
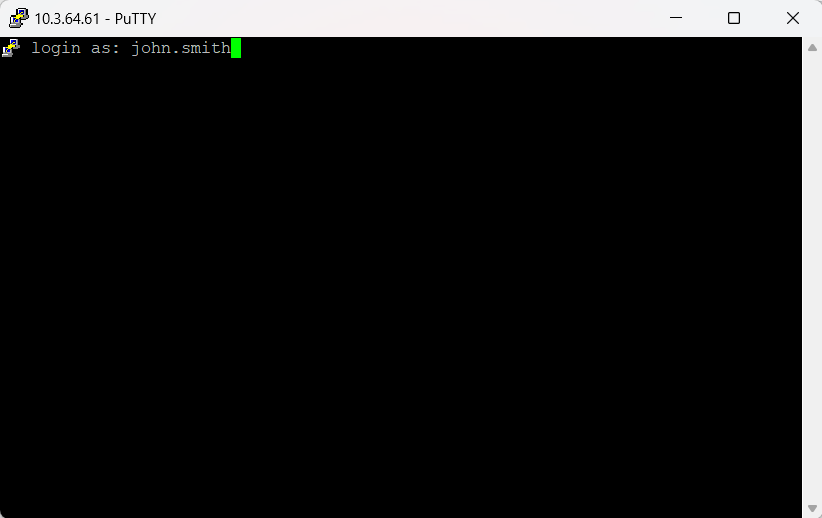
If you prefer to use an SSH client with a graphical user interface on Windows, we recommend PuTTY. The following illustration shows how to connect using PuTTY:
- In the PuTTY configuration window, enter
10.3.64.61(the IP address of the Shabyt login node) in theHost Namefield. - Under
Connection type, selectSSH. - Click the
Openbutton. - On your first connection, PuTTY will display a security alert. Confirm it by clicking
Accept. - A terminal window will open, prompting you to enter your username. Type your username and press
Enter. - You will then be asked to enter your two authentication factors:
- First factor: your password
- Second factor: the six-digit PIN generated by the Google Authenticator app on your phone
Transferring files
Files can be transferred between your personal computer and the HPC clusters using the scp command in the terminal. This command works like the standard Unix cp command, but allows you to specify a remote address as the source or destination. For example, to copy a file called myfile.dat from the local directory /my/local/path/ on your computer to the remote directory my/remote/path/ inside your home directory on the Shabyt cluster, use:
scp /my/local/path/myfile.dat john.smith@shabyt:~/my/remote/path/
Here, john.smith is your Shabyt username, and the tilde ~ is shorthand for your remote home directory path. On Shabyt, this corresponds to /shared/home/john.smith, so the full destination path would be /shared/home/john.smith/my/remote/path.
As an alternative to scp, you can use the sftp command-line utility. This works like the traditional (but insecure) ftp command, but uses the Secure File Transfer Protocol (SFTP) for encrypted transfers.
If you prefer a graphical interface for file transfer, there are many free and commercial SFTP and SCP clients available. A widely used option that supports SFTP on all major operating systems is FileZilla. For Microsoft Windows users, another popular choice is WinSCP.
